Tuning your bow to your arrows & your arrows to your bow.
Tuning your bow to your arrows & your arrows to your bow.
BOWS AND GrizzlyStik ARROWS
By Jeremy Johnson
Archery is an experience that is unique to each of us. My archery experience is centered around hunting, and the pursuit of my goal of 100% success in the harvest of my quarry. The best method I know to achieve any goal is to start with the “desired result” (in this case killing the animal every time), and work backwards from there. As we all know, many things have to come together for this “desired result” to happen. However, no one can argue that the last two things that must happen to achieve this goal is a lethal shot must be made and the animal must be recovered.
I use the bow and arrow system I do because I have complete confidence that it will make a lethal shot on any animal in north America every time if I do my part in shot placement and tuning. The following is how I came to this conclusion.
When most people think of getting geared up for bow hunting, the first thing they think of is getting the right bow then buying some arrows so they can shoot it. In my experience this view seems a little backwards. In all my years of bow hunting I have never killed any animal with a bow. However I have killed many with broadhead tipped arrows, so wouldn’t it make sense to use the most lethal arrows possible and then buy the bow that can most accurately shoot those arrows? So the first question that must be answered is, “What is the most lethal arrow and broadhead combination?” Then figure out “What is the best way to deliver that arrow?”
THE ARROW SYSTEM
When hunting with archery equipment quick kills are achieved by hemorrhage (loss of blood pressure), or collapsing the lungs. Both of which result in a lack of needed oxygen to the brain, muscles and organs. Without oxygen no animal can survive. If both lungs are not collapsed, then the rate at which blood loss occurs, coupled with the size of the animal determines if and how fast that animal will die, as well as how far it can travel before that happens. Many shots will create enough blood loss or physical complications to be lethal but the question is how long will it take? Seconds, Minutes, Hours, Days? How much ground could that animal potentially cover before it dies? How much of a blood trail will it leave to aid in tracking?
Endless arguments have been waged about which arrow setup is the more lethal for hunting. On one side you have the theory that lighter and faster arrows with small broadheads and a flatter trajectory make it easier to “hit the vitals.” Lets call this the “shot placement” group because they are relying on shot placement to get the job done. On the other side you have the theory that big broad heads and heavy arrows that will “plow through anything” are the way to go, despite there lobbing trajectory. Lets call this the “lethal penetration and hemorrhage” group.
Visit any gathering of bow hunters and there will be more than a few very opinionated folk ready willing to try and convince you one way or the other. Hour upon ear bending hour I have listened to both sides make their cases in search of the answer to which system will give me the best odds of success.
Before I open this can of worms let me just say this: In my search I spent time in both camps and shot many animals with both types of arrow setups. I interviewed successful hunters and those that lost animals. I made and witnessed as many kills as I could. The bottom line is, and always has been, regardless of what arrow setup you use, what kills 95%+ of recovered, archery shot animals is the loss of blood pressure and/or the collapsing of that animals lungs. The faster this takes place, the sooner the animal will expire, period.
“ Lethal shot placement” by definition means shooting the arrow into an area of the body will cause enough trauma to result in a quick death. The variable in shot placement is, the amount of penetration and hemorrhage will dictate exactly what shot placement is lethal and what one isn’t.
“Lethal penetration and hemorrhage” means inflicting enough wound to create the blood pressure loss or lung damage necessary for the animal to expire. How much trauma is created depends on first the depth of the wound, the sharpness of the broadhead after entry and as it passes through the animal, and the width of the wound, in that order. The more “penetration and hemorrhage” an arrow can inflict the more options you have for a lethal shot placement (through the shoulder, front quartering for example). True you can get away with a lot more if you do enough damage and penetrate deep enough, but without reasonable shot placement a large wound on its own will not 100% guarantee success either.
Successful harvest requires two things. First “lethal shot placement” and then a “lethal penetration and hemorrhage.” Having one without very much of the other is only “sometimes lethal.”
Shot placement right in the lungs on that famed broadside shot will undoubtedly kill that elk every time, right? Wrong! Shot placement alone will not kill that elk, the arrow must be able to cause enough of a wound to collapse both lungs to result in a clean kill and recovery.
Here is an example I have seen far to many times. A hunter and his buddy call in a mature old six point bull to inside 20 yards. With his brand new bow and confident as Robin Hood, he cuts loose one of those 380 grain “you name it” arrows, leaving the bow at a blinding 320 feet per second. A rib or shoulder bone gets in the way of an otherwise perfect lung bound shot (how often does that happen). The arrow either breaks stopping all penetration, or the broadhead dulls or shatters, only getting six inches of penetration and barely hitting one lung with what’s left of a short, mangled piece of tin. He will almost certainly lose that animal. True there are many instances that major bone structure is missed and this same shot will kill the elk, but not 100% of the time. That said shot placement is not a 100% guarantee of success.
Now lets take that same scenario and put someone from the other camp in it. This old timer shows up at elk camp with his 20 year old PSE and a quiver full of fletched rebar with Buck knives on the end, sure to take down any elephant or rhino that might happen to wander through camp. Okay not quite but you get the picture right? “Back in the day” he could put all six of his arrows in a pop can at 30 yards. Resting on the pride of his past success he didn’t feel the need to prepare before season, the last time he practiced, tuned or sighted in that dinosaur was probably “Back in the day.”
Buck fever is in full force when the bull steps out broadside at under 20 yards. His arrow corkscrews toward the beast. Over his back the arrow goes, and self inflicted butt kicking results. All that “lethal penetration” didn’t cause to much hemorrhaging when he “placed the shot” in the side of that tree.
I know from experience that one factor without the other is only “sometimes lethal.” My goal of 100% success doesn’t allow for “sometimes lethal”. I want precise accuracy and devastating penetration not hindered by bone contact and massive tissue damage and two holes for blood loss - 100% of the time.
THE BEST ARROW SYSTEM
Dr. Ed Ashby has researched the subject of arrow lethality more extensively than anyone on the planet. His years of research has proven what works best to make quick and clean kills. These studies have shown that lack of penetration is the number one cause of not killing an animals with archery equipment. He goes on further to describe in order of importance twelve factors that will maximize arrow penetration. These factors are as follows:
1. Structural Integrity
2. Arrow Flight
3. Forward of Center - the more, the better
4. Broadhead Mechanical Advantage
5. Shaft to Ferrule Diameter
6. Arrow Mass or Weight
7. Broadhead Edge or Finish
8. Shaft Profile (tapered is best)
9. Broadhead and Arrow Transitions and Finish
10. Type of edge Bevel (higher on the list when bone is hit)
11. Tip Design
12. 650 Grains or more (higher on the list when bone is hit)
* For a complete description of each of these factors and why they are important
read the "Top 12 Penetration Enhancing Factors".
Complete arrow penetration or a “pass through shot” that leaves two holes in the animal regardless of what bone is hit on the way through creates the most potential for blood pressure loss or collapsing the lungs. This results in shorter track jobs and a greatly reduced the chance of “losing” the animal. GrizzlyStiks arrow and broadhead combination has incorporated eleven of the twelve factors to create what is proven to be the most lethal arrow and broadhead combination possible. I would strongly encourage all bow hunters to take the time to read Dr. Ashby’s studies and see what the facts are about not just penetration but arrow lethality as a whole.
The one penetration factor you can’t build into an arrow also happens to be the second most important on the list is “Arrow Flight”. The one lethality factor you can’t build into an arrow is "Shot Placement." As our second hunter proved the most lethal arrow in the world won’t kill a thing when it’s buried in the side of a tree. This is where I take the next step back from my goal to the things responsible for arrow flight and shot placement - my bow, or "Arrow Delivery System" as I call it, and shooting form and shooting skill.
THE ARROW DELIVERY SYSTEM
Shooting form is a major player in arrow flight, the value of which cannot be over stated. The best equipment in the world can never reach it’s full potential if the user lacks the skill to take advantage of it, but since we are on the subject of equipment, I’ll stick with the bow for now.
To achieve perfect arrow flight lets look at what poor arrow flight is and the factors that cause it. Then eliminate or minimize as many of those factors as possible. This is of the utmost importance when shooting broadhead tipped arrows.
Poor arrow flight, or an arrow that wobbles in flight, does this for one of four reasons.
1. Improper spining or amount of shaft flex
2. Irregularities in the broadhead / arrow combo
3. Vertical nock travel
4. Horizontal nock travel
A matched set of quality, properly spined arrows and broadheads for your draw length and weight that spin true and are in good condition will take care the first two from the list.
However in regards to spining, there is a benefit to shooting stiffer arrows. The stiffer your arrow can be and still tune correctly the better. This is because a stiffer arrow has less side to side deflection. Less deflection means quicker recovery from the archers paradox , less impact paradox and a better flight with broadheads.
Unfortunately not all bows are capable of shooting a very stiff arrow. This is because some bows inherent vertical and/or horizontal nock travel requires more flex from the arrow shaft to absorb these disruptions to perfect arrow flight, which takes us into the next two factors.
Vertical nock travel is caused by one or more of the following:
1. Improper nock height - Different bows require the nock be placed at different heights on the string. Ideally if the upper and lower halves of the bow are performing equally, the nock should be set level with the rest, (not many bows are capable of this).
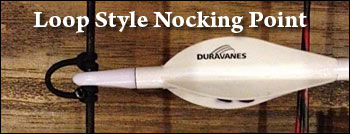
2. Tight or loose nocking point - A nocking point that either pinches the arrow nock and doesn't allow a clean release or one that is to loose therefore allowing vertical nock travel.
3. Improper cam timing - With Dual or hybrid cam systems both cams need to be rotating and stopping at the exact same time. If one cam is ahead of the other an upward or downward thrust of the arrow will result. Single cam bows basically have both cams at the bottom and an idler wheel at the top. These are not typically adjustable.
4. Improper rest height - The rest should be adjusted vertically so that there is absolutely no chance of fletching contact with the riser or buss cables. The old rule of thumb here is to adjust it so the arrow shaft sits level with the rest attachment bolt in the riser.
5. Fletching interference - Erratic arrow flight will result with fletching contact of any kind.
Rub powdered chalk on the outside edges of your fletches, then shoot your bow. Any interference will show up as a chalk line on either you cables, riser, or rest.
6. Misadjusted or unmatched limbs (check tiller) - A weak or mismatched limb can affect vertical nock travel. Limb bolts should be adjusted equally so the load is the same on the top and bottom limbs. Do this by turning them all the way tight until they bottom out on the riser, then back them out an equal amount of turns until desired draw weight is achieved. After this check to make sure the tiller is the same on the top and bottom. The tiller measurement is the distance from where the limb joins the riser to the string.
7. Bow designs not capable of a level nock travel - Many bow designs are not capable of a perfectly level nock travel. This is because the upper and lower halves of the bow do not do the exact same thing at the exact same time with the exact same force.
Horizontal nock travel:
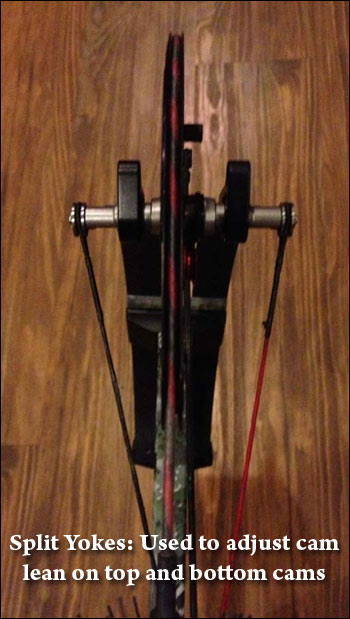
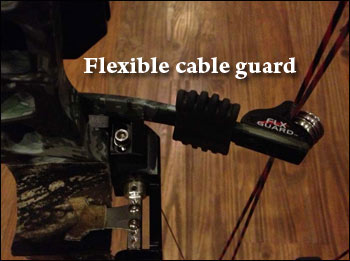
1. Cam Lean - When a bow is drawn, there is a severe load placed on the buss and/or control cables. Since these cables are pulled to the side by the cable guard (necessary for arrow/fletching clearance) a lateral or sideways load is placed on the cams causing them to lean to the side. When the arrow is released and tension is relaxed, the cam moves back to vertical causing horizontal nock travel in the string. Cam lean can be adjusted on bows that have split yoke buss cables by adding or subtracting twists from either side. This is why it is best to use a cam system that offers split yokes on the top and bottom cams. Bows that have flexible cable guards dramatically decrease this sideways load and as a further benefit, lateral hand torque is greatly reduced and accuracy is increased.
2. Limb Twist - Limbs are designed to be flexible, this is where the bows energy comes from, so vertical flex is both necessary and desirable. However as this vertical flex occurs, as mentioned earlier the load on the buss cables increases. The same sideways load that causes cam lean is also transferred to the limbs and riser which causes the limbs to twist and further compounds lateral nock travel. Once again tunable split yokes and a flexible cable guard greatly reduce this. Another way to combat this is by shortening the limbs. By decreasing the length of the limbs you decrease the limbs ability to twist. The down side to shortening limbs is that the shorter the limb, the less energy potential it has. To solve this problem the Center Pivot Riser was invented. A Center Pivot Riser is one that has traditional limb pockets on the inside ends of the limb as well as fully supported pivot points at the center that eliminate twist. So with the Center Pivot Riser you get the speed and power of a long limb and the lateral stability and smooth, quiet shot of a short limb.
3. Riser Flex - A bows riser is a literal engineering marvel. The riser must take the simultaneous pushing and pulling of the limbs, sideways torque of the cable guard, and forward pressure of the grip, all with the least amount of flex possible. Flex in the riser can cause tuning issues that cannot be resolved and only sometimes masked by rest adjustments. With this issue you have to purely rely on the engineering and quality of materials that went in to the bow at the factory.
4. Improper horizontal rest adjustment - Ideally the arrow rest should be set to center shot. In other words the side to side adjustment of the arrow rest should leave the arrow resting exactly along the center line of the riser for optimum arrow flight. When the problem of horizontal nock travel exists and it cannot be corrected by any other means, a side to adjustment of the rest is often required to help compensate for the problem. Erratic arrow flight will result when the rest not adjusted properly.
5. Fletching interference - Erratic arrow flight will result with fletching contact of any kind.
Rub powdered chalk rubbed on the outside edges of your fletches, then shoot your bow. Any interference will show up as a chalk line on either you cables, riser, or rest.
6. Bow torque and shock - A bow that vibrates, torques up, down, or side to side upon release can affect arrow flight, however most of the felt bow torque and hand shock takes place after the arrow has already left the bow. A smooth shooting bow actually relaxes the shooter enough to allow him or her to have better follow through and keep an open grip. A bow that torques or jumps at the shot causes the shooter to react by gripping the bow or flinching thereby inducing erratic arrow flight on their own regardless of how well the bow is tuned. A well balanced, quiet, and smooth shooting bow makes it much easier to practice good form and become a better shooter.
THE BEST ARROW DELIVERY SYSTEM
The best “Arrow Delivery System” is one that gives me the best arrow flight with my broadhead tipped hunting arrows to maximize my lethal penetration. When you have the best possible arrow flight shot placement is merely a matter of sighting in your bow, the rest is up to you. Selection of this bow comes down to which bow eliminates the most of the nock travel issue and gives me the best broadhead flight. Several bows out there have a few of these accuracy enhancing features listed, but only one company has all of them piled into one bow - BOWTECH.
The Bowtech Invasion CPX, Insanity CPX, and Insanity CPXL have all these features and have proven themselves to shoot GrizzlyStik arrows with perfect arrow flight from the instant it leaves the riser to the instant it passes through the animal. When I finish paper tuning my Bowtech bows to my GrizzlyStik hunting arrows the result is a perfect bullet hole at all distances.
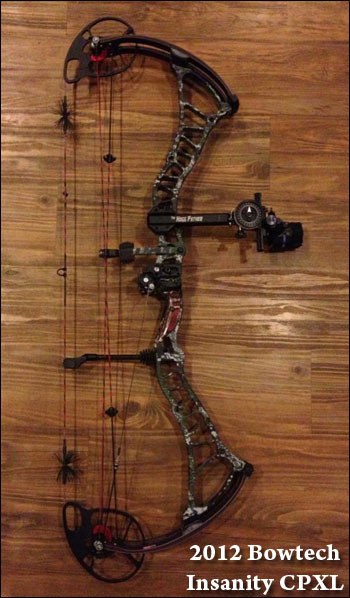
Here is how I set up my Bowtech Insanity CPX.
1. Set the center shot. To do this I mount my rest in place and nock a straight shaft, not a GrizzlyStik or any other tapered shaft. I then measure from the outside of the shaft to the front of the riser cutout, then measure from the outside of the shaft to the back side of the riser cutout. Adjust the rest horizontally until these measurements are equal. This is the center shot of your bow, there will be no more horizontal adjustments made to the rest from here on out.
2. Set the vertical adjustment on your rest so that the bottom of your arrow sits right about level with the bottom of the rest mounting hole. Make the nocking point level with the rest to start with.
3. Set cam timing. There are static cam timing marks, which will get you very close, but I prefer to also check timing at full draw. For this job you can use bow scale setup, Hooter Shooter, or two people, one person drawing the bow, and the other watching the cam stops to ensure they are both hitting the cables at the exact same time upon reaching full draw. Adjustment can be made to the buss cables by adding or subtracting twists to the single loop end, ( hint: it doesn’t take much, sometimes a half twist may be all you need if any.)
4. Shoot through paper. First get your vertical tear gone by moving the nocking point or the rest up or down as with any bow. If your cam timing is on, you should find your nocking point pretty close to level. Next to eliminate any side to side tearing adjust the top and bottom split yokes on the buss cables equally. Tighten the left side for tail left tears and tighten the right side for tail right tears until a perfect bullet hole is achieved.
*Perfect arrow flight is key to not only broadhead accuracy, but also to ensure maximum penetration upon impact and the most velocity potential.
*A well tuned bow that can shoot a stiffer arrow can increase the penetration potential because of the reduced impact paradox of those stiffer arrows.
*I highly recommend the Overdrive Binary Cam system to those wanting to both increase their penetration potential, and/or increase their accuracy and maximum range, especially with larger broad heads. The tuning ability of this cam system allows for better arrow flight than systems that do not have the ability to adjust cam lean and true center shot.
*See Bowtech’s Nick Droback and his YouTube video demonstrating this procedure. “Paper Tuning With the Overdrive Binary Cam System”
In closing there is not a more lethal combination than a GrizzlyStik single bevel tipped arrow fired from a Bowtech. With this system I get precise accuracy and devastating penetration not hindered by bone contact and massive tissue damage and two holes for blood loss - 100% of the time.
I use the bow and arrow system I do because I have complete confidence that it will make a lethal shot on any animal in north America every time if I do my part in shot placement and tuning.
Related Posts